
So here we go - I made a set of lovely patchwork style pillows for a mini home decor project. I thought that since they were such a simple project with a lot of different possibilities, they would make a great tutorial. I found some old Joel Dewberry Modern Meadow fabrics scraps as well as some Robert Kaufman Essex Linen in Natural (I LOVE LINEN) and put them to good use.
Let me start with a little photo of what you'll end up with:

The finished pillow is about 20 inches wide x 15 inches high. But will seem a little less because of the puffiness of course.
Let's get started!
Start by gathering some supplies:
- 4 coordinating fabrics for the patchwork squares. You will need a 5.5 in x 5.5 in square (x2) for each fabric
- (2) strips of fabric 21 in W x 2.75 in H
- back piece approximately 21 in W x 15 in H (don't cut this yet!)
- polyester batting (or whatever brand you prefer). I get the very fluffy kind!
- matching thread
NOTE: If you plan on washing your pillow, you will want to pre-wash and shrink your fabrics! In which case, you'll want to wait and cut your pieces after this process is done.
Once you have your squares and top and bottom strips of fabric cut, you should have something that looks like this:

Let's start sewing:
Please note that throughout this tutorial I am using a 1/4 in seam allowance!
Start by sewing your 1st row of patchwork squares together. Place square 2 over square 1 right side together, pin and sew your seam making sure to backstitch. Press the seam open.

Then pin square 3 to square 2 and sew together. Press seams open and continue like this until you have sewn the top 4 squares together and then the 4 squares of your 2nd row. You should end up with something like this:

Now you are going to flip your top row of squares over the bottom row, right sides together and try to line up the seams between your squares as perfectly as possible. Pin in place. Sew the 2 rows together and press your seam open again working slowly to make sure your patchwork is nice and even and flat.
It should look something like this from the back:

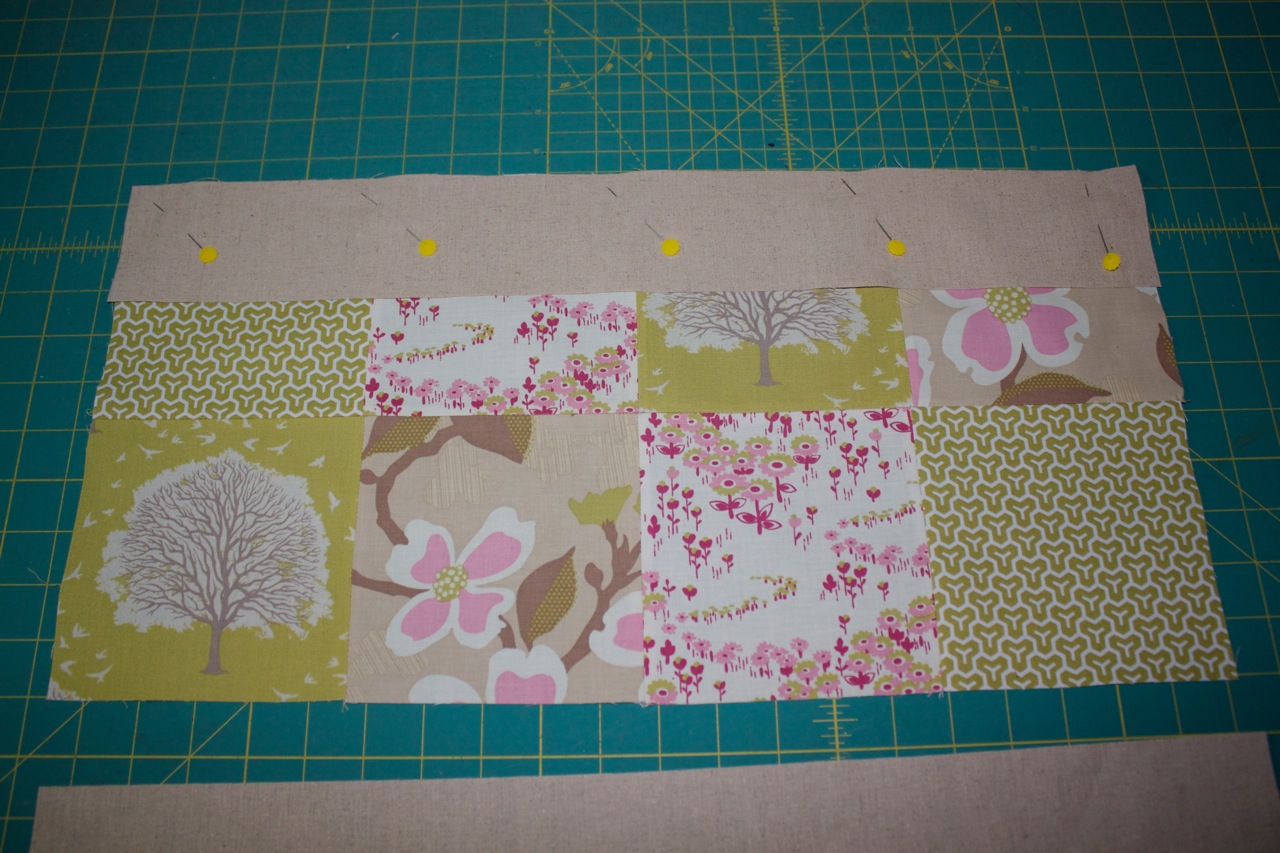
Now we add the top and bottom strip of fabric (linen in my case) to the patchwork. Your strip may be a little wider than your patchwork - don't worry about that right now! We are going to trim it later.
So here we are with the top strip pin to the top of the patchwork, right sides together. Sew the seam, press flat. Repeat for bottom strip.
Here is our completed front panel for our pillow:

Take a long ruler and trim the sides of your panel if it is uneven. (I trimmed a bit on the left side).
Now we are going to use the front panel to cut out a piece of fabric for the back of our pillow. I used the dogwood bloom print from the patchwork. I would've preferred to use the linen but I didn't have enough. :(
NOTE: You can repeat the whole patchwork panel again and use it for the back of your pillow. Which would probably result in a prettier pillow but for the sake of this tutorial and getting it finished before children wanted something from me, I didn't.
Place your patchwork panel on top of your fabric WRONG sides together and make sure it is nice and flat. Cut out your back panel.

Now take your back panel and place it over your front panel right sides together and pin in place. Now you want to sew a seam around the outside of the panels using a 3/8 in seam allowance. I like to take a bit more here because I want a sturdier seam. Pillows really take a beating in my house.
Stitch all around leaving a 3 inch gap at the bottom for turning. I make sure to backstitch at the beginning and end of this seam because I don't want to have my stitching unravel when turning the pillow.
Confession: I HATE sewing by hand. So I make my gap as small as possible without damaging my stitching.

Clip your corners:

Turn your pillow right side out. Gently push out your corners so they look nice. You can use a chopstick but I like to use the handle of a paintbrush because the ends are nice and round. (I've used chopsticks to disastrous results.)

TIP: To make your hand stitching MUCH neater and perfect, press your opening closed trying to follow the edge of the seam as perfectly as possible. Do this before your stuff the pillow. Of course.

Stuff! Make sure you stuff into the corners otherwise they will be empty and your pillow will not look very nice.
Now the tricky part (for me). Hand stitching the opening closed. I use a ladder stitch. I found many wonderful tutorials and diagrams online which I don't want to replicate or use without permission. So here's a wonderful video I found.
When you are done stitching, your opening should look like this:

And you're all done! Feel free to comment, ask questions and I will try to respond ASAP.
Happy sewing!
Congratulations on a great, "first of many" tutorial. Can't wait to try one out for myself!
ReplyDelete